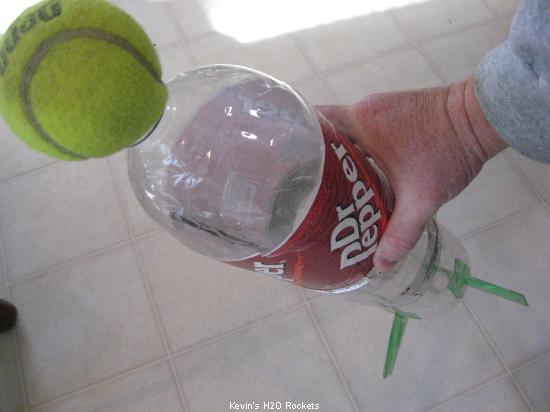
| Lets start off by taking a look at the rocket. You'll notice right off the tennis ball on the nose cone. This provides a number of characteristics for us. There's no doubting why this rocket is called The Bouncer. The tennis ball moves the center of gravity well ahead of the center of pressure. It also provides us a cushion during the bounce landing. We will talk more about that later. |
 |
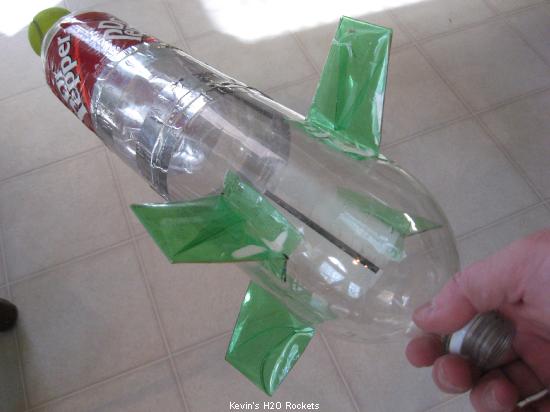
Here's a look at The Bouncer from the opposite end. Notice our fins are aerodynamically shaped. The fins will be the most difficult part of the creation of this rocket. |
 |
Between our two bottles, we have a sleeve that helps structurally with our rocket a small bit, and it helps with aerodynamics a bit by removing an area of turbulence, and providing a greater surface of the rocket to help push the center of pressure further back. |
List of materials: To build The Bouncer, you will need:
- 4 two liter bottles in total
- 1 tennis ball
- 1 plastic grocery bag
- foil tape
- a tube Goop brand glue (or equivalent)
- scissors or knife or both
- a ruler
- a Sharpie brand marker (or equivalent)
- a drill
- a 1 inch spade drill bit
- a table clamp
- and a couple of rubber bands.
|
 |
We will start by cutting the sleeve that joins the two main bottles. Take your ruler and hold it up against the side of one of the two-liter bottles. Find the highest flat point of the bottle. Place the Sharpie pen against the bottle and spin the bottle around drawing a line around the bottle where you will cut the top of the sleeve. This point will be approximately 8 inches from the base of the bottle but may vary based on different shaped bottles. |
 |
Use a knife or scissors to cut along the line. Believe it or not, scissors and knifes may be sharp. My lawyers advise me to caution you, because you may cut yourself. Let's be careful out there folks and put some lawyers out of business! |
 |
Here is our "headless" bottle. From this bottle, we can actually get two sleeves! The flat side of a two-liter bottle is long enough to make two sleeves. Bonus! |
 |
Here is the sleeve off to the right with the cone and base of the two-liter bottle cut away. This sleeve is actually long enough to make two sleeves for The Bouncer. You can cut this sleeve in half. You may want to mark another line half way up the sleeve to help you cut an even line. |
 |
I am using my knife to cut off the bottom. The bottom line doesn't need marking as there is often a ridge the I can use as my cutting guide on the bottom. |
 |
In this picture, I am testing out my sleeve by putting the bottoms of two bottles together with the sleeve between them. The bottoms of the bottles should fit well together with the sleeve providing some support. If the bottoms are not fitting well together, cut the sleeve down some to make a good fit. If the sleeve is too short, try again on another bottle until you get enough sleeve that will join the two bottles. |
|
Once you have the sleeve sized just right, cut two 14 inch lengths of the foil tape. Peel off the backing and tape the upper and lower seam of the sleeve to the bottles. Take care to make this as even and smooth as possible. Wrinkling will always occur, but if you minimize the wrinkling, it will maximize the aerodynamic properties of the rocket. |
 |
Get the 1 inch spade drill bit. Place the tennis ball into a table clamp to hold it while you are drilling the hole. Do not hold the tennis ball in your hand while drilling! That's stupid and unsafe! Anyway, drill out a hole. It won't be perfectly round but we won't need it to be. |
 |
Take your plastic grocery bag and stuff it into the tennis ball. This will provide some additional cushion when The Bouncer comes crashing back to Earth. You can use any material that you like, but these plastic grocery bags are cheap, plentiful, and water proof. |
 |
Here is a picture of our tennis ball ready to go with the grocery bag inside. |
 |
With a little effort, this tennis ball should slip over the cone of The Bouncer. The two-liter bottle should have the cap on it when the tennis ball is slipped over it. This provides us a couple of features: (1) it makes the tennis ball fit snug and tight and (2) on crash landing, the cap will hold in the air pressure in the upper bottle and keep the top bottle from crushing too much. Without the cap, the top bottle would crush a large amount and it may be difficult to straighten it out again. |
| So, the only step left is the fins. The fins are a complicated enough task that I've created their own section and instructions. Please refer to the fin making guide. |
| Go have some fun launching your Bouncer rocket. It's one of my favorite designs of rockets. |