|
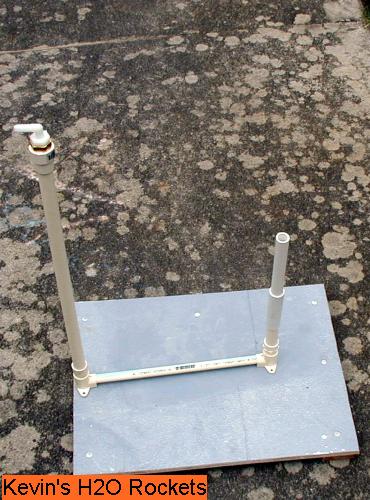
Here is the foundation of the portable launcher. I thought you might want a look at it in it's (almost) completed state. The only thing left to do here is to screw down the CPVC elbows, some PVC cement, hook up the hose and put on the cable ties. |

|
Starting from the beginning, this launcher is designed to go to the beach. Because of the rocket blasts, I wanted a big base to absorb most of the exhaust blast so the water didn't kick up a bunch of sand. |

|
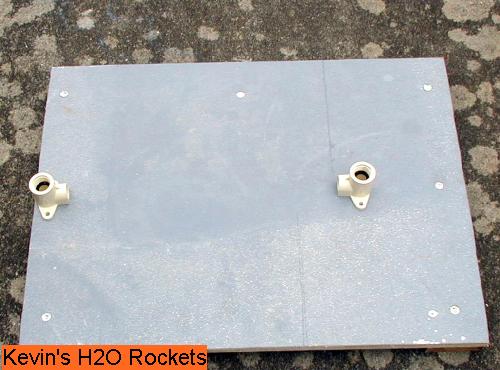
There was a piece of half inch painted plywood in the garage. I started with that. I had a couple of pieces of oak laying around and I made some feet for underneath the ends. I anticipated that the feet might come in handy for keeping the platform level. I used roofing nails to attach the plywood and the oak feet. The roofing nails shouldn't rust too quickly in the salty environment of the beach. |

|
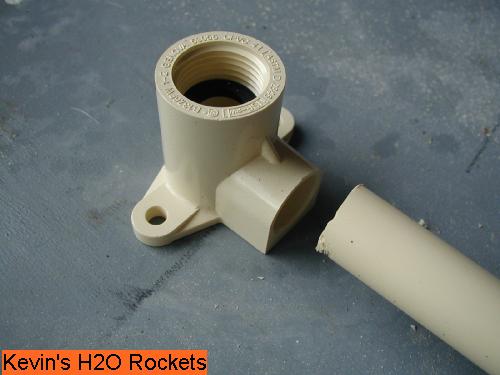
These CPVC elbows have two characteristics I was looking for in my portable launcher. (1) It had flanges so that I could use screws to attach it to the base. This is compared to passing the tube through the base or strapping it down in some manner. (2) It had a threaded end. This is key to making my portable launcher in that I could screw and unscrew the launcher stack and the inflation stack. |

|
Here's the half inch CPVC that I've cut with a hacksaw. Notice all of the burrs and mess left over. This quickly cleaned up by running my finger along the edge followed by some utility knife cleanup. |

|
I'm not too worried about the end not being squared off too much. The end will be inserted into the elbow and glued in with PVC Cement. This is a good time to point out that I'm working with CPVC and not PVC. This will cause me a problem in that CPVC has a different outside and inside diameter than PVC does. I'll be addressing that soon. |

|
My handy utility knife makes quick clean up of the rough edges. |

|
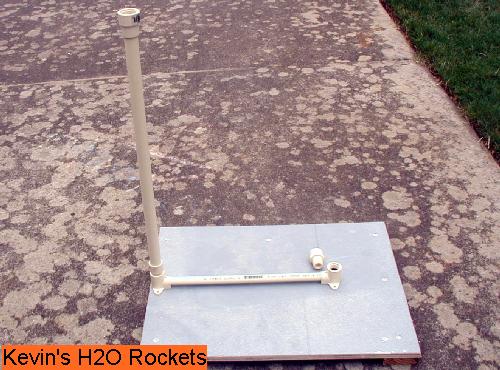
Here's my stand put together in a "dry fit". I'm checking things out. The inflation stack will be the side closest to the edge. The launching stack will be the side in the middle of the platform. This is to help absorb the blast of takeoff. |

|
Here's a closer look at the elbow and the CPVC tube. The horizontal tube is smaller than the verticle tubes. If this was a commercial system, I might be concerned. The tube will be carrying low pressure from air for short durations. I'm not going to sweat it. |

|
Here are the adapters. They will be glued to other CPVC tubing but notice the threaded end. They will be screwed into the elbows once I get to my launching site. (The beach!) I did make one mistake though. One adapter has a hex collar and the other does not. I should have bought them both with the collars. It makes it easier to get a snug fit with pliars and the extra leverage. |

|
Here is one of the adapters screwed into the elbow connector. Notice that the elbow connectors have a rubber washer in them which will help create a seal. |

|
I've placed a 3/4 inch CPVC tube into the adapter. I like having my inflation column higher than my lauch column just in case some water gets into the tubes, it won't flow back to the pump. |

|
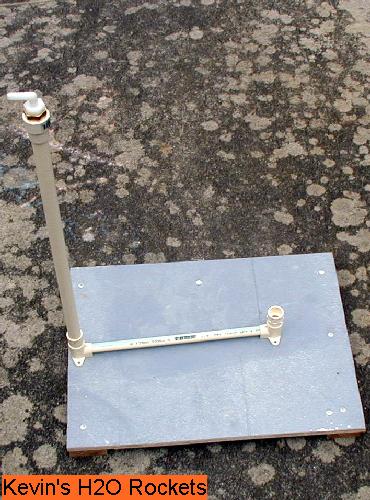
Here is my inflation column with a threaded female adapter at the top of it. |

|
The threaded female CPVC adapter will accept a brass converter and a platic water tube kit. The water tube kit adapter will allow the inflation column to accept a water tube that leads to my bike pump. |

|
Now we begin work on the launcher side column. Here the threaded adapter is screwed into the female elbow adapter. |

|
A short 3/4 inch CPVC tube is inserted into the threaded male adapter.
*** THIS IS WHERE IT STARTS GETTING TRICKY ***
The OD (outside diameter) of a 1/2 inche PVC tube fits perfectly inside of the throad of most PET bottles. 2 liter, 20 oz, etc.
The OD of a 1/2 inch PVC pipe is just over 13/16ths (21 mm). The OD of a 3/4 inch CPVC pipe is 14/16ths (22.5 mm). Adapting
3/4 inch CPVC pipe to 1/2 inch PVC pipe isn't easy.
|

|
The solution is to make my own collar that will be the adapter between the two sized pipes. You can (kinda) see the collar here. |

|
Here is the effect that I'm after. A PVC collar that fits both the CPVC and PVC tubes. |

|
I'm using the 7/8 inch (14/16th inch) spade drill bit to bore out the 3/4 inch PVC pipe to accept the 1/2 inch PVC. |

|
I'll use the 7/8 inch (14/16th inch) spade drill bit to bore out the 3/4 inch PVC pipe to accept the 3/4 inch CPVC pipe. The OD of the CPVC pipe is actually just bit over 14/16ths so I needed to bore out an additional bit to get a snug fit. |

|
After slow progress, I finally get the collar to where I want it. An application of PVC Cement will seal it up tight. The hardest part is over. A drill press would have made this whole process easier. |

|
Here is another job where I have to bore out a tube to make an adapter. The OD of a 1/2 inch CPVC pipe is 10/16ths of an inch. |

|
10/16ths is also very close to the inside diameter of a #94 "O-ring". The OD of the #94 "O-ring" is also just slightly larger than the throat of a 2-liter bottle. This provides the seal while pressurizing the bottles. |

|
After using PVC Cement to glue in the CPVC tube inside of the 1/2 inch PVC tube, I can now place the #94 "O-ring" over the CPVC tube. The edge of the PVC tube will help hold the "O-ring" in place. |

|
I bore out another piece of 1/2 inch PVC tube which slips over the top of the CPVC tube. This tube helps guide the rocket on launch when the rocket is moving slow, before the effect of the fins can take hold. |

|
Here we are assembled. We're almost ready for a rocket. Just a few more steps left. |

|
Here's what it looks like with a 2 liter bottle slipping over the tubes. The rubber ring will fit snugly inside of the throat of the bottle, holding in the pressure. |

|
One more look at the assembly of the launch tube. |
|
|
Here we are with the tubes fully assembled. We just need the tube leading to the air pump, and then the cable ties construction to hold the bottle down while pressurizing. |

|
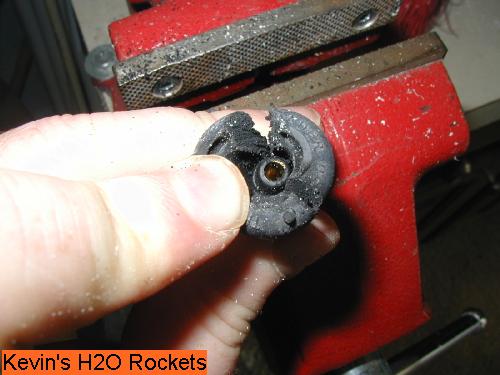
It is time to discuss the preparation of the tire stem. Automobile tire stems can be purchased at Ace Hardware, Lowes,
Home Depot and other hardware stores for a couple of dollars. They come with large rubber bushings at the base of the stem.
This won't do for our purposes so we will cut it away using a utility knife.
|

|
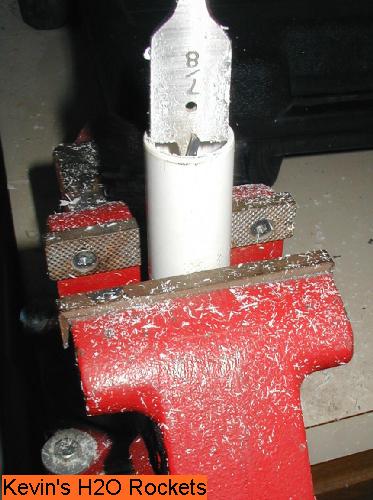
A comment on safety: I have a firm believe that most home products fail because items being cut aren't properly
held. If you look in many of these picures you'll see one of my wisest purchases: a workshop vise. $50: easy money. |

|
With the tire stem in the vise, I use a utility knife to carefully cut away most of the rubber. I only cut
away enough to fit the flexible hose that leads to the launcher. |

|
I still have a lot of rubber to remove to get it to fit into the ice maker hose. I have to get it close to just the brass tube in the center of the stem. |

|
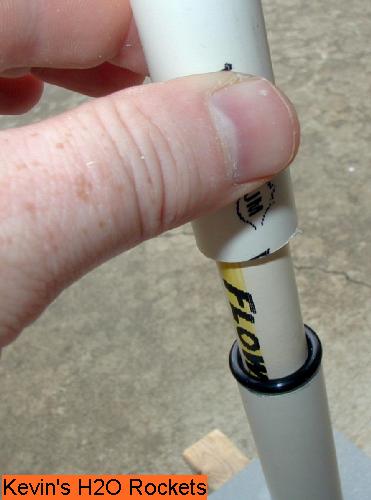
Here is a close up of the point where the ice maker tube is attached to my vertical tube on the launcher. |

|
Here is a close up of the stem inside of the ice maker tubing. I've placed two small hose clams on the tube to better handle the pressure. When a great pressure is applied to the tube, it will expand a bit. Two clamps help keep the tube in place and keep the pressure from escaping. |

|
Here is my "Clark Cable" cable ties. I have 15 cable ties anchored around the tube. If I was to re-do the ties, I would have made them shorter so that they spring away from the bottle faster and farther. The fine tuning never ends. |

|
Here's my launcher with my PVC collar. Sch 40, 1 1/2". Outside diameter is 2" or 50.5 mm. |
|
That's about it for my portable launcher. I can unscrew the verticle columns and store it in a flat box. In fact, the 2 liter bottles take up much more room that the launcher does. If you have questions for me, or if I need to clarify something, drop me a line. |