| The first step is to get the stem prepared. I was able to buy a pair of Presta stems from ACE Hardware for a couple of bucks. The key is that they are covered in rubber. I used my utility knife to carefully cut this away. The rubber was quite persistant and I had to be very careful not to cut myself. After a few minutes of work, I had the metal stem exposed. |
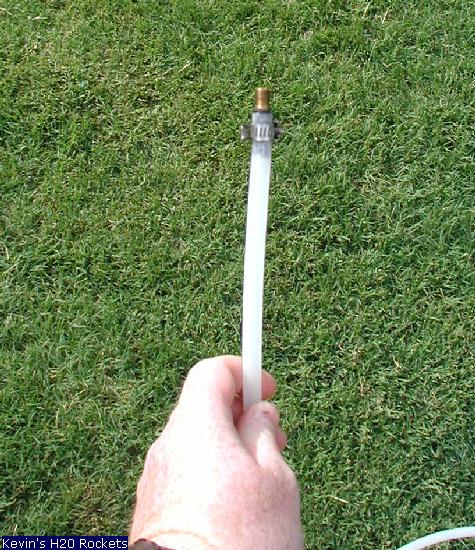
 The stripped stem from above just fits inside of a "Ice Maker" hose that can be picked up at Home Depot, Lowes, or other hardware store. I was given strong assurance that the hose would well handle the 100PSI I was going to load it with. Notice the hose clam around it. Without it, the pressure would shoot off the hose for sure.
 |
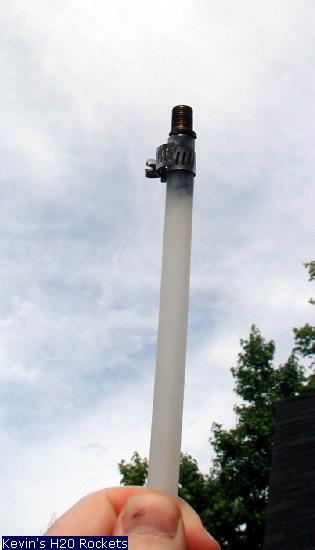
 Here's another look at the point where the stem meets the hose. The hose that I purchased was 25' long. Enough to keep me well out of danger as I'm adding on the pressure to the system.
 |
 This next picture shows the other end of the hose. Basically, we need to interface this hose somehow into the 1/2" PVC system. I accomplish this with a couple of brass adapters. On that hose clamps onto the hose and adapts it to a 5/8" threaded male connector. The other connect is an adapter with the 5/8" female adapter on one end and the 1/2" adapter on the other end. This in turn, threads into the 1/2" PVC adapter with a straight collar that fits over the 1/2" PVC pipe. One point to make, is that the entire system need to be air tight. Some teflon plumbers tape might be a good idea for the brass adapters. Some PVC cement "melts" these pieces together.
 |
 Here is a look "under the hood". I built my stand out of 2x4 and 2x8 wood. I drilled through that with a 1/2" spade drill bit. With a couple of the 1/2" PVC elbow connectors, PVC cemented together, I've made my U shape. The fact that the PVC passes through the holes I drilled in the wood, helps steady it during launches. If you notice, I've used a couple of larger cable ties as straps to hold the PVC in place and snug under the launcher. It's worked great so far. Another side benefit to the wood platform is that it helps keep things clean by absorbing the water "exhaust" from the rocket so it doesn't blow a hole into the mud below the launcher. You can see some dirt splattering, even as designed. The wood takes most of the force of the thrust.
 |
 I'm jumping way ahead to show the working end of the Clark Cable launcher. From below, there is the 1/2" PVC pipe. Ignoring the cable ties, etc. on further up, you'll see the 1/2" PVC coupling. This is what forces the cable ties to flange outward. Next comes another section of 1/2" PVC. Here's the tricky part. The CPVC pipe that you see has an outside diameter (OD) that is larger than the inside diameter (ID) of the 1/2" PVC pipe. The OD of the CPVC pipe is almost exactly 5/8". Take a 5/8" spade drill bit and bore out the 1/2" PVC pipe, allowing the CPVC pipe to be cemented inside of it. Remember, that this junction must be air tight so this is a time to be careful with your work. The rubber ring that you see is just rolled over the CPVC pipe until it hits the 1/2" PVC pipe. The rubber ring is a #94 O-Ring that can be picked up at most hardware stores for much less than a dollar. This O-Ring is what the 2 liter bottle fits over and it holds the water within the bottle.
 |
 You'll notice that I've slipped another bored out 1/2" PVC pipe over the CPVC pipe. This pipe is not glued onto the CPVC pipe. This pipe helps guide the rocket when it's it's most unstable; when it is just gaining momentum and speed. Notice that the OD of the O-Ring just extends beyond the OD of the 1/2" PVC pipe.
 |
|
Now we'll be discussing the cable ties and how they come into play. Below the PVC coupler, I've wrapped some insulated copper wire around the 1/2" PVC pipe. This wire wrapped several times around the PVC pipe so that the "bump" is about 1/2" wide. This creates a bump for us. This bump helps pin the cable ties so that they don't move while we're adding pressure to the system. I then take a couple of rubberbands and loop them so they fit snug over the 1/2" PVC pipe. I'll be using these rubberbands to temorarily hold the cable ties in place until I can get them pinched down when I have them exactly where I want them. One rubber band is above the wire and one below. These are the two points where the cable ties will be pinched down and a good place to hold them as I'm arranging things. |
|
I then start positioning cable ties, under the rubber bands and over our "bump" of wire. I position them so that the head of the cable tie is pointing inward to the 1/2" PVC pipe. The heads will actually do the holding over the neck of the 2 liter bottle. Once I've added enough cable ties to that they fill in all around the pipe, I take another cable tie and bind down the cable ties. Make sure to try putting the 2 liter bottle on the pipe and over the O-ring to try this out before fully ratcheting down the horizontal cable ties. Another note of caution is to make sure that all cable ties are at the same vertical level. When ready ratchet down the cable ties: one above the wire ring and one below so that the cable ties are bent over the wire. Notice that I kept my lower rubberband in place to keep the bottoms of the cable ties from flaring out. I guess I could have cut them off but I can tug on them for re-alignment later. |
 We use another piece of PVC pipe to slip over everything. This forces the cable ties to bend their heads over the flange of the 2 liter bottle. You can see that I've put two small screws on each side, then attached a cable loop between them. This is what I use to tug down on which is my trigger. By releasing the cable ties, they spring outward releasing the bottle which wants to release it's internal pressure, thus a rocket is born.
 |
 From this picture, you can see a small O-hook at the bottom of the stand. I run a string from the loop on the large PVC segment, through this O-hook, and out away from the launcher. Tug on the string, and the PVC will fall, releasing the cable ties, releasing the rocket. In this picture, I haven't fully slid the collar over the cable ties yet but the rocket is snuggly twisted over the #94 O-Ring. We'll be adding pressure in moments.
 |
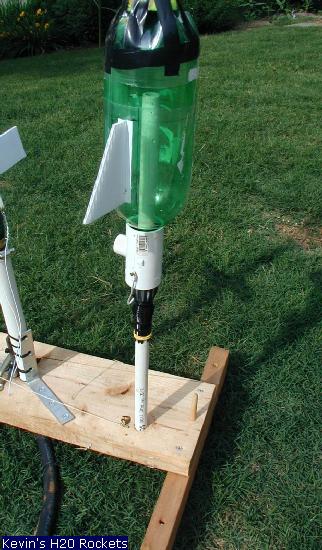
 In this picture, the collar is completely over the cable ties and holding tight onto the rocket. I'm ready to add pressure and then tug on my string to release the rocket. I did several tests of the rocket when it was "dry"; no water. It still launched it many feet into the air at modest 60 PSI pressures.
 |
| To load the rocket onto the launcher when the bottle has water in it, I've found it necessary to tip the launcher on it's side as I get the bottle on the O-Ring. The easy way that the collar slips off of the cable ties during launch means that I don't necessarily need to stake down my launcher like I did with the Quick Release Launcher. Good luck with your new obsession. Play it safe.
|